
9 essential tips for black and white landscape photography

Even with the onset of modern technology bringing us superior colour reproduction and detail in modern digital cameras, the old-school art of black-and-white landscape photography is still as popular as ever, if not more so.
Black and white photos continue to have a very powerful and emotive effect. When done well, they can be even more striking than those super bold colour-saturated images you see splashed over social media.
So, if you still love this old medium, we’ve compiled a list of 9 essential tips for black-and-white landscape photography that includes subjects ideal for this.
1. Contrast is the key element

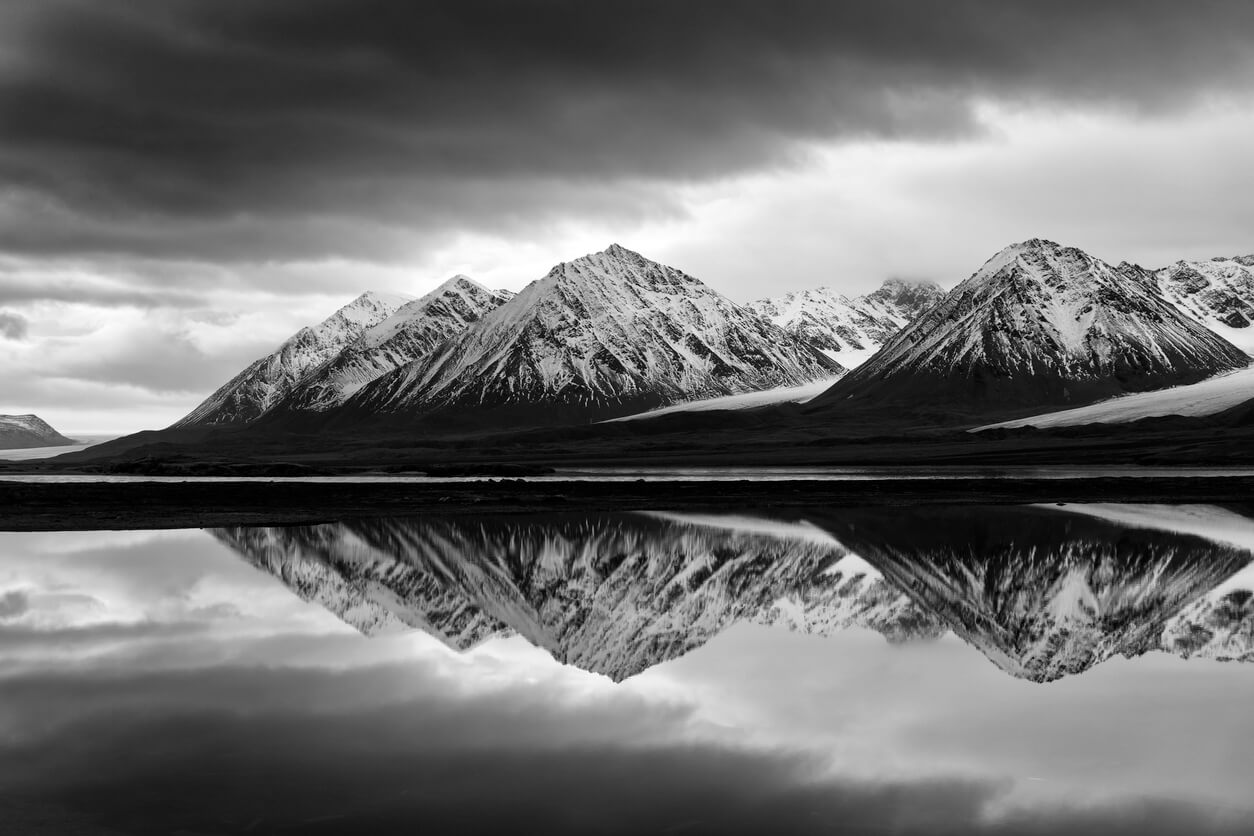
Unlike shooting in colour, high contrast is the key element to black-and-white landscape photography.
It flies in the face of what we ordinarily look for in traditional colour landscape photographs.
Normally, a high-contrast scene can be lacking in colour and texture. We want a range of tones to help separate elements and provide a broad spectrum of colours, texture and beauty.
Whether bold or subtle, the colour helps us pick out the elements and texture of the scene. Take most landscape photos and convert them to black and white—all that is lost, and the image looks flat.
When shooting black and white, it’s not the scene’s colour that is important, but rather the contrast provided by the interplay of light, shadow and extremes of colour.
We are looking for a strong contrast between the two to create an impactful dynamic image. Backlit scenes are a good example of this.
2. Look for strong contrasting colours


While colour plays a less crucial role here, it’s not entirely unimportant.
The primary differences to look for are strong contrasting colours that will be discernible as light and dark when converted to black and white.
The obvious will be bright white against black or even very dark blue. Others, such as dark red and light yellow, are also ones to look for.
The contrasting colours of a deep blue sky with scattered and bright, puffy white clouds often convert nicely to black and white. A polarising filter can help here because it helps to cut through the haze, darkens the blue parts and makes the clouds pop.
3. Set your camera to black-and-white mode when shooting, but keep the original in colour
It can be hard to visualise the world in black and white, and the colour you see before you can be distracting, especially when setting out to take monochrome photos.
Therefore, when you intend to capture the scene in black and white, the best way is to set your camera’s colour profile to monochrome.
You will then get a preview of the scene in mono on your rear screen or, if you have mirrorless, your viewfinder. This helps to pick out scenes that look great in mono.
Set your camera to shoot in RAW, or at least RAW + JPEG. For best results, it is always better to capture in RAW and do your own conversion to monochrome during post-processing.
When converting yourself, you can also control how you convert single colours by darkening blues and brightening the whites and other light colours to boost the contrast of your final black-and-white image.
You will also keep the colour version and, in some cases, may get an image that works well in both.
4. Pay even more attention to contrast, shapes, textures and leading lines
These are a no-brainer when it comes to photography, but this is ever more important in black and white.
When the colour is stripped away, elements in your scene can blend into each other even more and be hard to differentiate. Look for strong leading lines or well-defined edges that contrast with the sky, background or surrounding elements.
5. Shadows are your friend
In modern digital photography, the focus is ever more on getting a better dynamic range from your sensor.
However, in black and white, this is often the opposite. Shadows are your friend here, and help to provide separation.
Instead of looking for beautiful, smooth tonal transitions as in colour photography, we want to see more extremes between the scene’s light and dark parts.
Shadows help add shape and texture to the scene, which is ever more obvious when you strip away the colour. This is another reason why it’s often good to set the camera to black-and-white mode—you are no longer distracted by the colour and can focus on the light and dark within your scene.
Shadows can also provide interesting foreground elements or shapes within your photograph, especially when shooting architecture or cityscapes.
6. Shoot on bright sunny days, even at midday

Shock horror—this is the ultimate taboo in landscape photography! However, this applies to colour photography because the colours are washed out, and the light is harsh.
In black and white, we are looking for contrast—at this time of day, the contrast is at its highest.
A polarising filter is extremely useful here. It will cut through the haze and boost contrast in your scene.
Cloudless blue skies are boring in colour, but when you darken them with a polariser and then convert them to black and white, it has a much more dramatic effect.
It’s even more dramatic on days with blue skies and scattered puffy white clouds.
7. Shoot misty backlit scenes

Misty scenes work well in black and white, specifically because they usually lack colour. The mist is bright white and will stand out well.
However, look for scenes where the mist is backlit for maximum impact and drama—this will create more contrast between the mist and the landscape behind it.
The backlighting will enhance the whiteness of the mist, while the landscape and other elements in the scene will be dark silhouettes. This will create a powerful, dynamic image that looks great when converted to black and white.
8. Photograph water

Water is a wonderful subject for black-and-white photography. Water reflects light and often provides a lovely contrast between it and the landscape.
Ordinarily, for colour photography, you must photograph water, especially waterfalls and rapids, on an overcast day. Otherwise, the water is far too bright, and the dynamic range is too great for the camera.
Again, this is not the case for black-and-white photography, and you can shoot waterscapes at any time of the day.
The difference here is you need to look more for a scene where your surroundings contrast more with the water within it. Waterfalls and rapids are particularly great subjects for black-and-white photos.
9. Head out on cloudy, overcast or rainy days

We often think these kinds of days are a washout for landscape photography. The opposite is true, though, for black-and-white landscape photography.
An overcast day can be perfect for black-and-white seascapes and minimalistic images. Head down to the coast and look for a scene with a groyne, a pier, a lone boat, or some well-defined rocks in the foreground.
Look for momentary breaks in the cloud that allow a shaft of light to break through. These moments can add real impact to your image, especially over water.
Also, use an ND filter to get long exposures to create that fine art, minimalistic look.
Like anything, practice is the key to improvement. So get outside, put these 9 essential tips for black and white landscape photography into practice, and see what you can come up with.
About the author:
Ian Middleton is a travel and landscape photographer and writer. He is the author of several books, including a practical guide to photography. His photography has been used in numerous publications worldwide, and is sold as high quality wall art online.
Visit his website for more info: https://ianmiddletonphotography.co.uk
Specialist photography insurance through Ripe
Black and white landscape photography is one of the most satisfying methods to master. But, it doesn't come without risks to your equipment, which is why you may want to protect your camera and accessories through specialist photography insurance.
At Ripe, we arrange cover that can be tailored to fit your exact requirements, so you only ever pay for what you need. You can cover up to £60k of equipment for theft and accidental damage, so you can feel at ease during your shoots.
Find out more about specialist photography insurance, or get a quick online quote today.
Please note the information provided on this page should not be taken as advice and has been written as a matter of opinion. For more on insurance cover and policy wording, see our homepage.
Please enter a valid email address.
Please Please tick one of the boxes below.
The latest news – direct to your inbox.
Subscribe for all the latest news, tips and offers from the Ripe Group. You can unsubscribe at any time. For information on how we use your data, please see our Privacy policy.
Thank you for subscribing, you’ll be hearing from us soon!